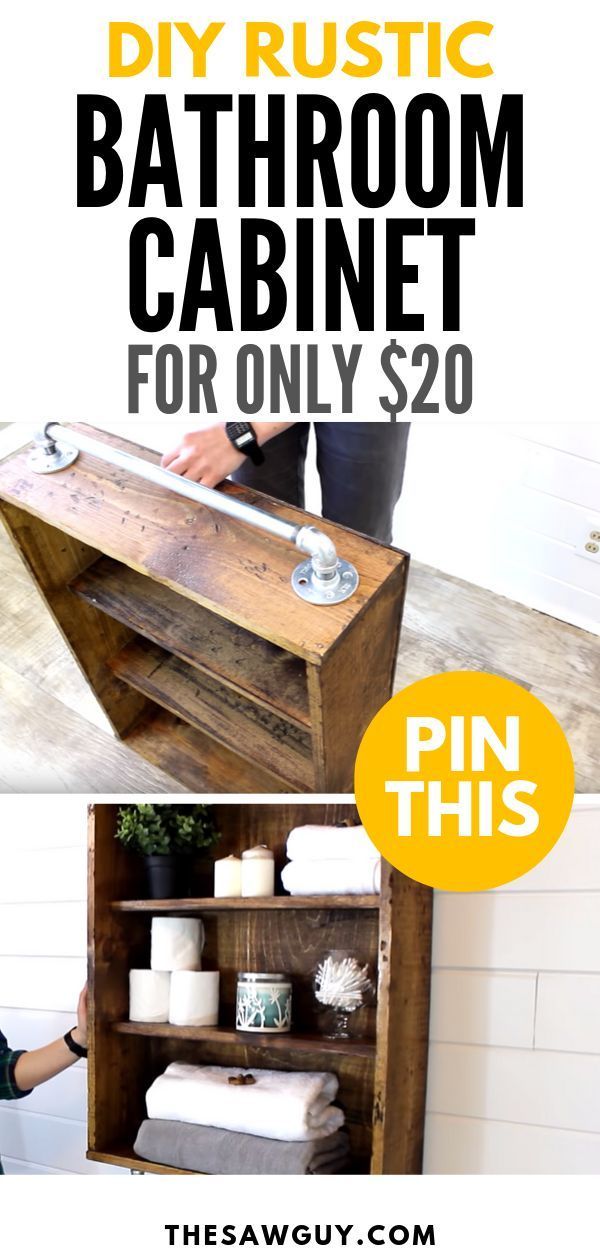
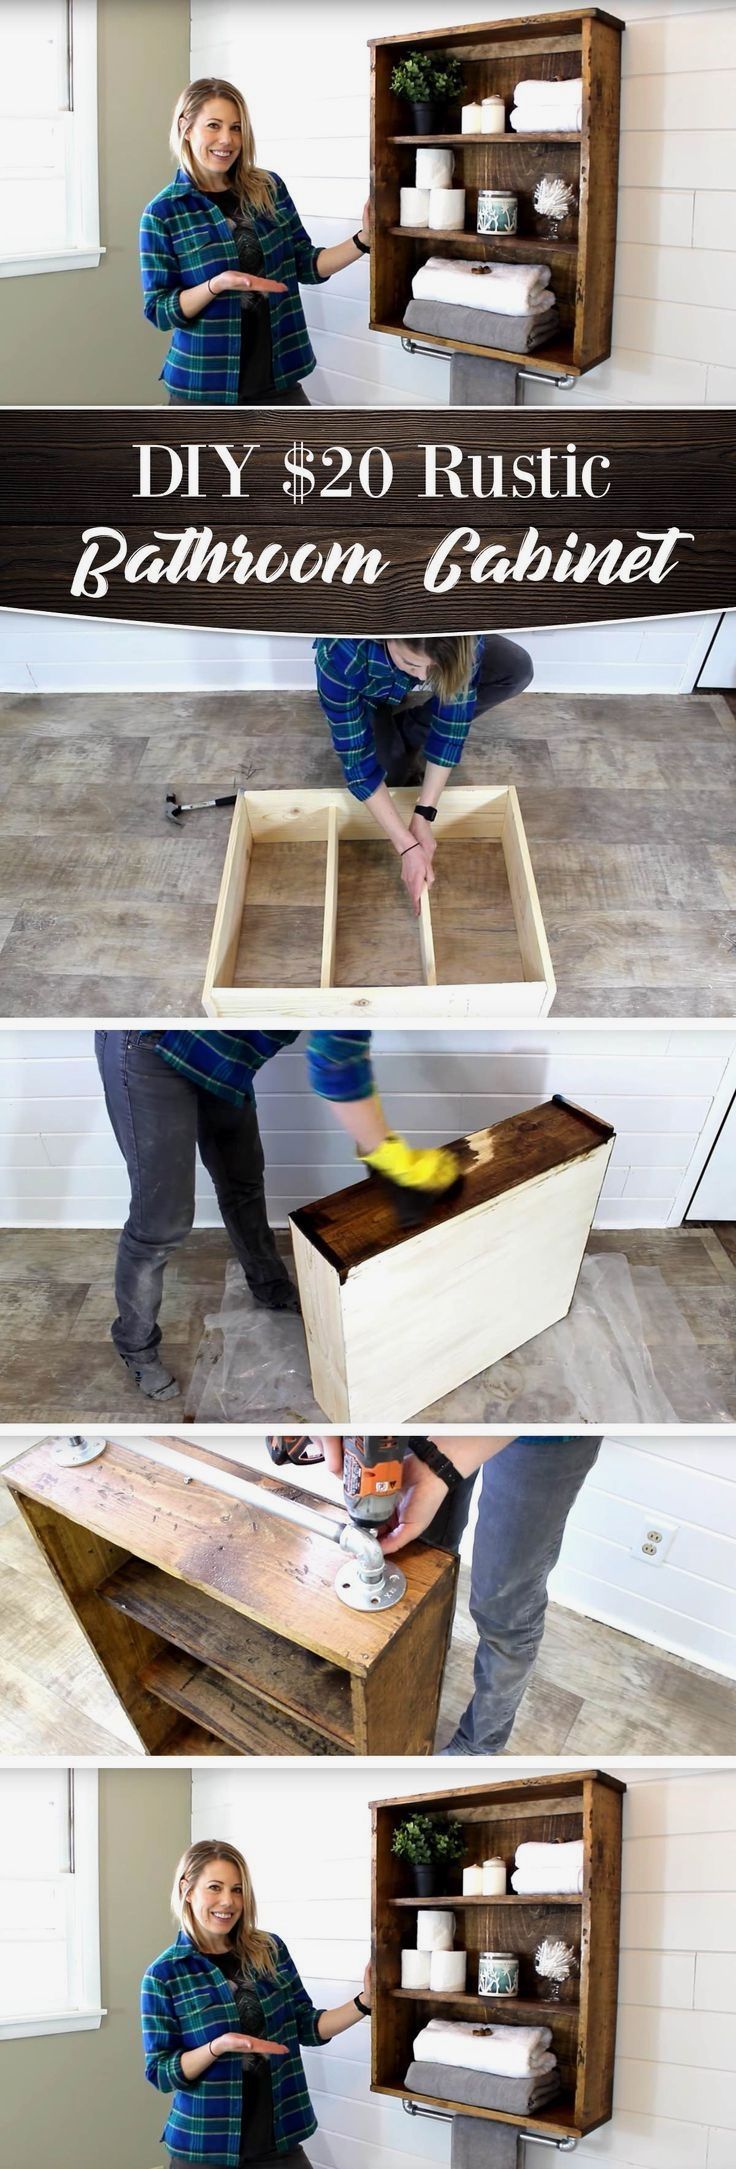
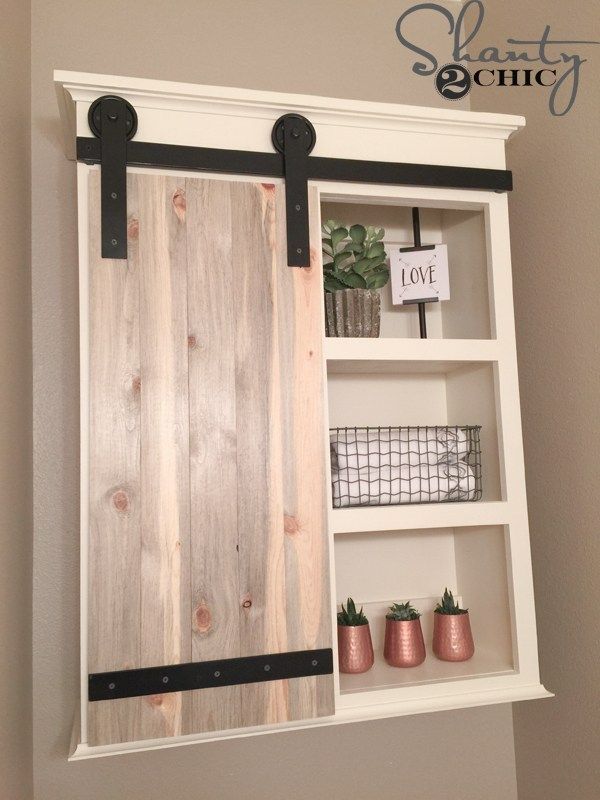
15 diy Bathroom cabinet ideas
Page 8 of 15
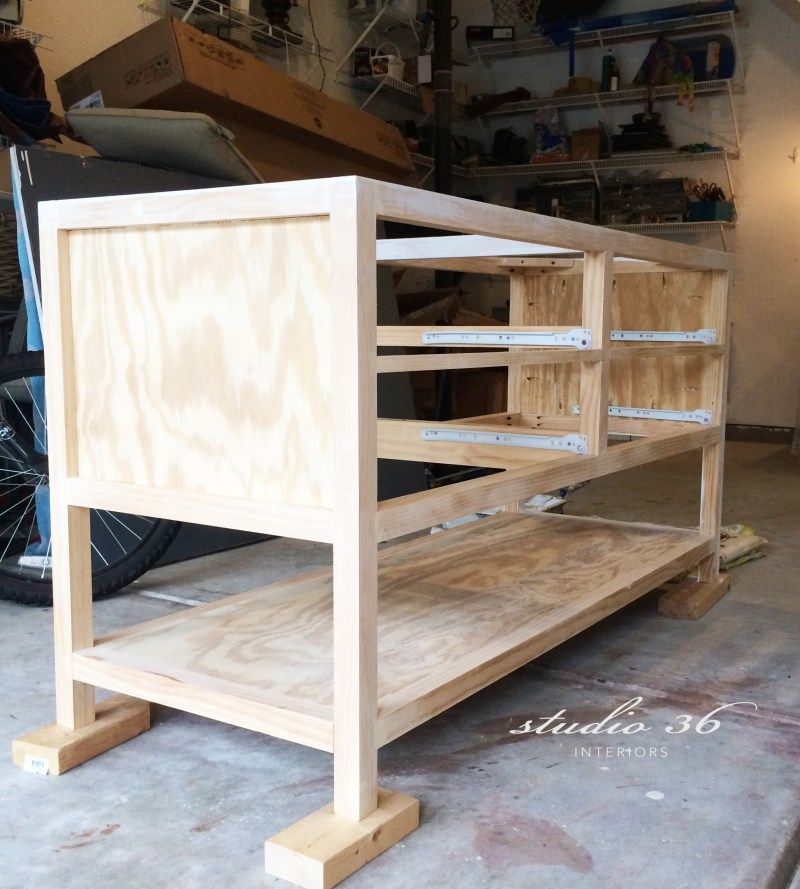
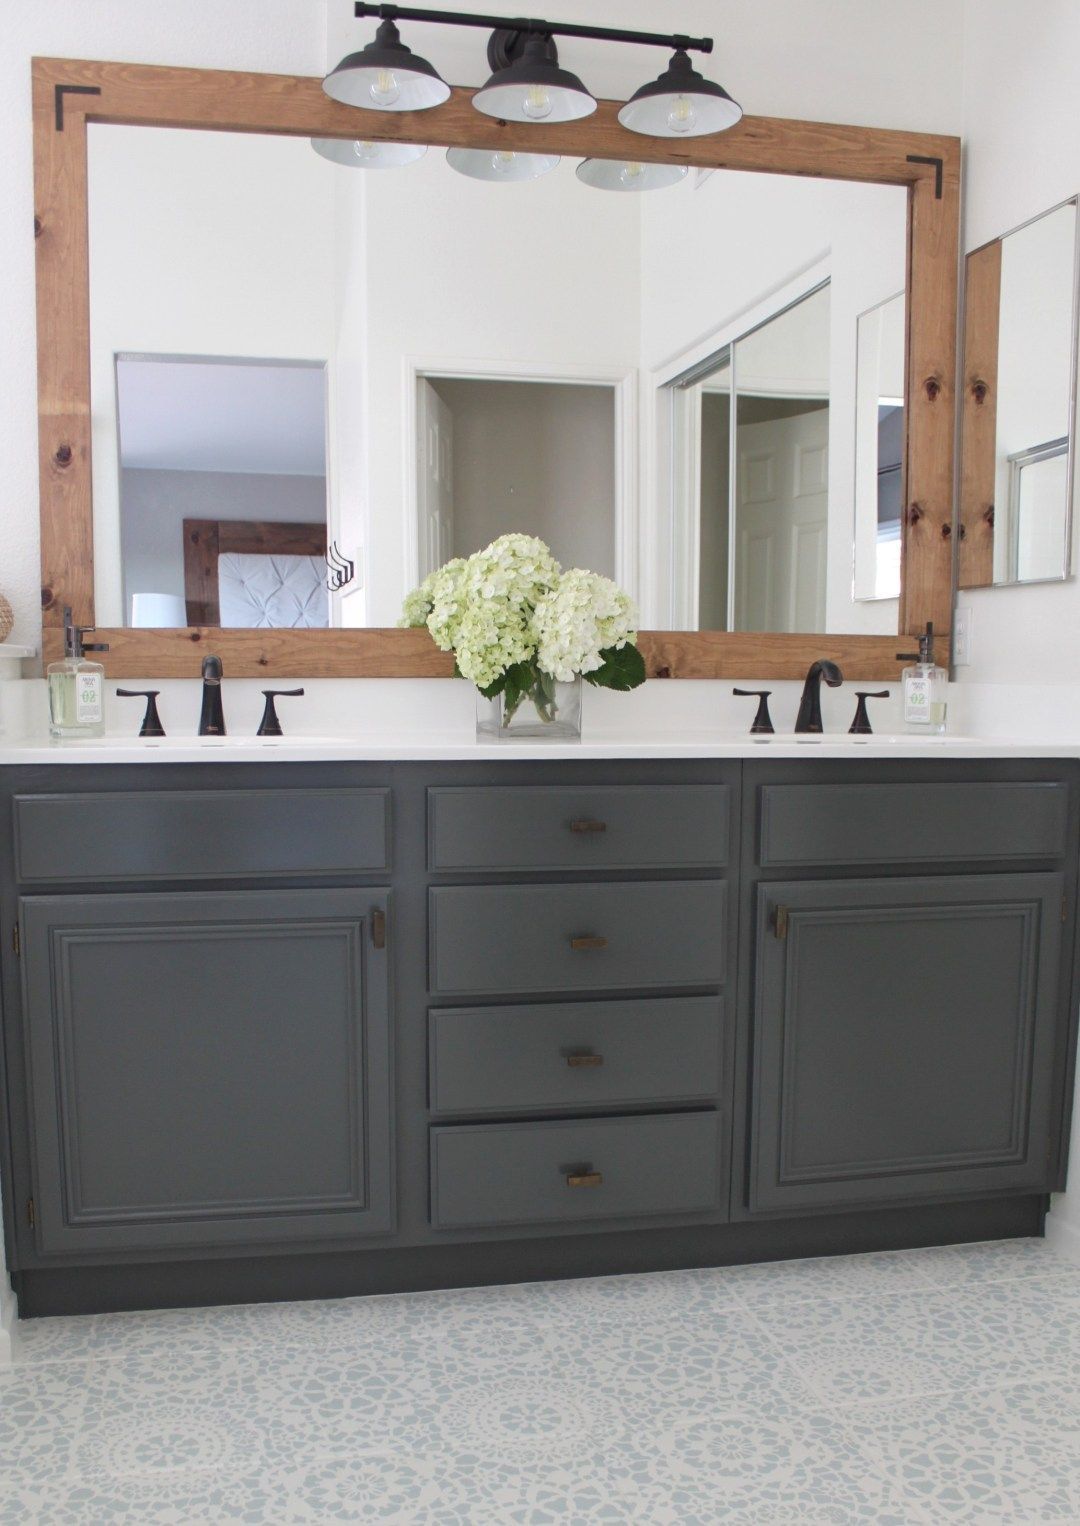
DIY Bathroom Cabinet Makeover

via: bestdiylists.com
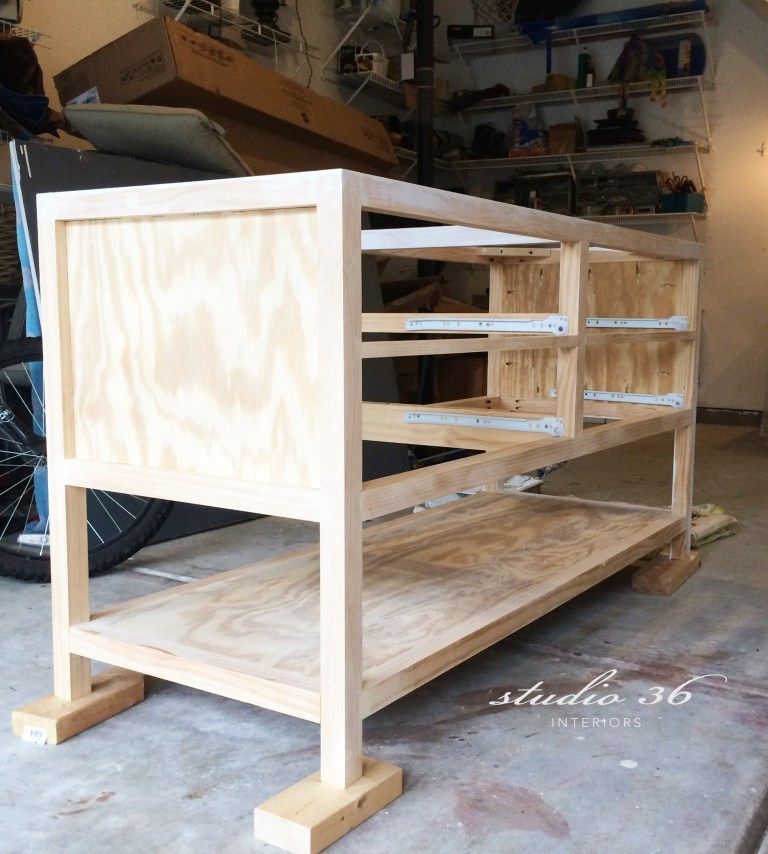
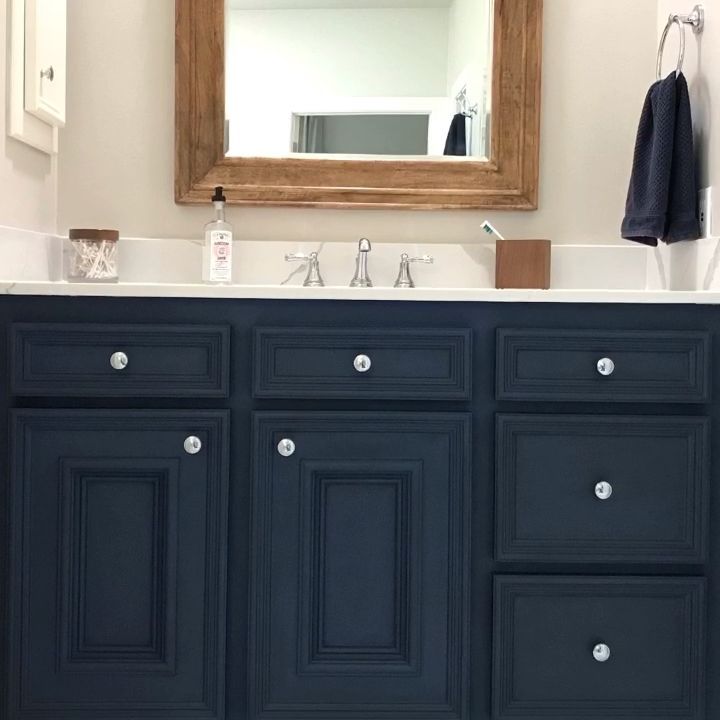
DIY Bathroom Cabinet Makeover #diybathroom the old vanity in my kids’ bathroom As you all should know by now, I recently gave my kids’ bathroom a renovation on a budget, and one of the biggest challenges of this reno was figuring out what to do with the old builder grade vanity. I hated the vanity, but my budget limitations made me consider keeping it and just altering it to look better. I considered painting it, updating the hardware, adding some faux feet, and installing new faucets. But that still just felt so blah to me. If I was going to spend some time and money changing the vanity, I wanted to make it something I LOVED! My goal with all of my makeovers is to bring a major transformation to the room creating a space I truly love for an affordable price. My goal is NEVER to create a room that’s just acceptable or slightly better than what was there. Altering the existing vanity would have made this slightly better than what was there, not something I LOVE. Based on my boho modern design for this bathroom, I felt like a vanity like this (in a different color) would be something I love: source However, the $1275 price tag (and that’s on sale!) for this vanity was most of my entire budget for the whole bathroom reno! Yikes! Plus I wanted my vanity to be a different color, and I also wanted it to be a little shorter than the standard 60” length. I realized the only option that would fit my space, style and budget was to make a vanity myself from scratch. I couldn’t find a tutorial online for a double vanity that I liked so I made my own tutorial. Follow along to learn how you can make your own custom bath vanity for a fraction of the price! This cost me about $200 for materials! elevation of vanity wall in bathroom WHAT I LOVE ABOUT THIS VANITY IS YOU CAN MAKE IT WORK IN ALMOST ANY STYLE BATHROOM —RUSTIC, FARMHOUSE, TRADITIONAL, MODERN, BOHEMIAN, INDUSTRIAL—SIMPLY BY CHANGING THE MATERIALS AND DETAILS. important notes before you begin My vanity was designed to be used with vessel sinks which will sit on top of the countertop. I have made this vanity 30” tall because my countertop is 1 1/8” thick and my sinks are 5 1/4” tall, giving a total height of nearly 37”. If you are going to use drop-in sinks with this vanity then you will definitely want to adjust the overall height of your vanity in order for it to feel more ergonomically correct. Try 36” tall or whatever feels comfortable for you. (That’s the great thing about making your own vanity, you can customize it to what you like!) Also, if you’re using drop in sinks the top row of drawers in the vanity will not be usable because the sinks will be in the way. You can turn the top drawers into faux drawers with fixed in place drawer fronts. Note that the enclosed area of this vanity (where the drawers are) is 16 3/4” tall. I specifically made it this tall in order to fully enclose all of the plumbing so it’s not visible. Since everyones plumbing can vary, it’s a good idea to verify that 16 3/4” will conceal all of your plumbing (the bottom of the enclosed area is 13 1/4” from the floor). If not, you’ll want to adjust that dimension on your vanity. This tutorial is for a custom 56” long double vanity, but this can easily be turned into a standard 60” vanity by adjusting the length. You could also adjust the length to turn this into a single vanity (it would actually be an easier build 🙂 ). My countertop for this vanity is solid wood because that is what goes best with my design. I have not tried using this vanity with a very heavy countertop like marble or granite. I assume it would be sturdy enough to hold the weight, but if you are planning to use a stone countertop I suggest verifying it is able to hold the weight before installing an expensive countertop. Like I said, it should be fine but I’m just letting you know I haven’t tried it. I personally wanted plain front drawer panels to create a minimal modern look in the room, but you could easily add molding or reclaimed wood to the drawer fronts to change the style of the vanity. What I love about this vanity is you can make it work in almost any style bathroom—rustic, farmhouse, traditional, modern, bohemian, industrial—simply by changing the materials and details. materials list (8) 2” x 2” x 8′ boards (1) 1” x 2” x 6′ board (2) 1” x 6” x 10′ boards (1) 1” x 6” x 6′ board (1) 1” x 8” x 10′ board (1) 4′ x 8′ sheet 3/4” thick plywood (1) 4′ x 4′ sheet 1/4” thick plywood 4 sets of 14” drawer slides 4 drawer knobs or pulls 2 1/2” pocket hole screws 1 1/4” pocket hole screws 1 1/4” wood screws 1 1/4” nails Wood filler Wood glue Sandpaper Primer/paint or stain tools list Circular saw Miter or chop saw Jig saw Drill Kreg Jig Electric sander Nail gun Carpenter’s square Level Measuring tape Pencil Safety glasses cut list (6) 2×2 @ 53” — long rails (4) 2×2 @ 30” — legs (10) 2×2 @ 19” — short rails and braces (2) 2×2 @ 13 3/4” — stiles (2) 1×2 @ 25 3/4” — mid-rails between drawers (16) 1×6 @ 12 3/4” — drawer sides (8) 1×6 @ 9 3/8” — drawer backs (4) 1×6 @ 6” — drawer backs (4) 1×8 @ 25 1/2” — drawer fronts (1) 3/4” plywood @ 53” x 19” — lower shelf (2) 3/4” plywood @ 13 3/4” x 19” — side panels (4) 1/4” plywood @ 24 3/4” x 13 1/2” — drawer bottoms front back (with drawers removed) The open back of this vanity leaves room for the plumbing. step 1: ASSEMBLE BOTH SIDE PANELS If you don’t do carpentry projects often, then let me begin by stating the following: All pocket holes drilled are made with a Kreg Jig and should be facing away from the visible side of the vanity. Test that the vanity is level as you go. Use your carpenter’s square to make sure all connections are at a 90 degree angle. If your connections are not at a right angle or your rails are not level, then your vanity could end up lopsided and pieces may not fit together correctly and no one wants a lopsided vanity 🙁 ! Use 2 1/2” pocket screws and wood glue to connect two of the 2”x2”x30” legs to the top 2”x2”x19” rail. Then attach the plywood panel to the legs and top rail using 1 1/4” pocket screws and wood glue. Be sure to keep the plywood flush with the back face of all of the 2x2s. This will make the front face of the plywood recess 3/4” from the outside face of the 2x2s giving it a recessed panel look. Now slide in the lower 2”x2”x19” rail and attach it to both legs (using 2 1/2” pocket screws) as well as the bottom of the plywood panel (using 1 1/4” pocket screws). Next, attach a 2”x2”x19” rail with 2 1/2” pocket screws and wood glue exactly 3” from the bottom of each leg. This will be used to support the lower shelf. Just a note here to say that after my messy kids started using their bathroom I discovered lots of trash, missing socks and lost clothes underneath this vanity (yes, my son is super messy!). I discovered it’s kinda hard to get everything out from under the vanity with only 3 of clearance. In retrospect, I wish I had made the lower shelf a little higher so it would be easier to clean underneath it. So if you think this is something that will bother you then you may want to raise your shelf a little higher. If my kids weren’t so messy it wouldn’t be a problem! Repeat all these steps again to make the other side panel. step 2: FRAME OUT THE VANITY TO CONNECT THE SIDE PANELS Use 2 1/2” pocket screws and wood glue to connect the side panels to each other by installing two 2”x2”x53” rails along the front and the back, keeping them both flush with the top of each side panel. Install two more 2”x2”x53” rails at the front and the back of the vanity at 15 1/4” from the top of the vanity. These long rails should align with the short rails below the plywood on each side panel. Next, using 2 1/2” pocket screws and wood glue, add two more 2”x2”x53” rails which will support the bottom shelf. These should be 3” from the bottom of each leg and align with the lower rails on each side panel. Using wood glue and 2 1/2” pocket screws, add a 2”x2”x13 3/4” stile to the front of your vanity between the top two 2”x2”x53” rails you installed. Make sure it is located at the exact midpoint of the long rails. Then add the other 2”x2”x13 3/4” stile to the back of your vanity between the top two 2”x2”x53” rails, again making sure it is at the midpoint of the long rails. Now it’s time to add the 2”x2”x19” braces across the middle of the vanity. Still using 2 1/2” pocket screws and wood glue, align the first one with the middle set of 2×2”x53” rails as shown. So it should be 15 1/4” from the top of the vanity. This will help stabilize the whole vanity. Now install another 2”x2”x19” piece directly on top of that one. This piece is added so that the drawer slides can be mounted to it. Now install the upper two 2”x2”x19” braces using 2 1/2” pocket screws and wood glue. The top one should align with the top of the vanity. The middle one should be located 6 1/2” from the top of the vanity. These braces are also needed for mounting the drawer slides and giving the whole vanity more stability. Add corner gussets to the four corners of the vanity. I used leftover pieces of the 1”x8”x10′ board and cut them into triangles (make sure they are exactly 90 degrees). Use wood screws and glue to install them making sure they stay flush with the top of the vanity. step 3: FINISH THE FRONT OF THE VANITY Install both 1”x2”x25 3/4” mid-rails on the front of the vanity using 1 1/4” pocket screws and wood glue as shown (the 1” side of the mid-rail should be facing the front of the vanity). Make sure each one is centered vertically as shown. step 4: ATTACH THE BOTTOM SHELF First, drill pocket holes along all four edges of the bottom side of the 53”x19” piece of plywood that will be used for the shelf. Making sure all pocket holes are facing down towards the floor, use 1 1/4” pocket screws and wood glue to connect the shelf to all four 2×2 supports keeping it all flush on the top. step 5: ASSEMBLE ALL FOUR DRAWERS First, take note that I made my drawers a custom “U” shape in order to get the maximum storage while also accounting for the plumbing under the sink. The notch in the middle of the drawer is there to avoid the drain pipe from the sink. A 6”x5 3/4” notch was enough to avoid the pipes in my vanity, but be sure to check what will work with the plumbing in your bathroom. You may need to have a larger opening or might be able to get by with a smaller opening. You can also just make standard rectangular drawers instead of doing a notch in the drawers if there’s enough room for you to avoid your the plumbing. A short 12” deep drawer still interfered with my plumbing so I decided to go with the “U” shaped drawers instead. Plus, I love the sectioned areas in the drawers! So organized! Also, like I mentioned at the beginning of this post, if you are going to be using drop-in sinks then the top two drawers will likely not be usable for you, so you’ll want to install just the front panels for those drawers creating “faux drawers”. You should have four 24 3/4”x13 1/2” 1/4” thick plywood pieces. These will be the drawer bottoms. Use a jig saw to cut a 6”x5 3/4” notch out of the top center of each piece of plywood. Use four 1”x6”x12 3/4” pieces, two 1”x6”x9 3/8” pieces, and one 1”x6”x6” piece to build the drawer sides as shown. Connect each piece with a nail gun and wood glue. You should also have four 1”x8”x25 1/2” pieces of wood which will be the drawer fronts. Use a circular saw to trim off the long edge of each piece so you have a final dimension of 25 1/2”x6 1/4” for each one. Now, attach the 25 1/2”x6 1/4” front panel of the drawer by inserting wood screws through the drawer front into the ends of the side pieces as shown. You’ll obviously want to countersink the screws so they are hidden. The bottom edge of your front drawer panel should sit 1/8” below the plywood bottom of your drawer. Repeat these steps for the other three drawers. step 6: INSTALL DRAWER SLIDES Attach the drawer slides according to manufacturers instructions to each drawer as well as the end panels and braces in the middle of the vanity. Now add the drawer pulls. Install the finished drawers in the vanity and make sure everything works well. step 7: FINISH IT Fill any holes with wood filler, give it a good sanding, and then prime/paint/stain it to your desired color. I used SW Naval for my vanity. I also recommend putting a few coats of clear poly on the inside of each drawer to help protect against spills. step 8: install it How you install this will depend on exactly what’s happening in your bathroom. Here’s what I did… I started by marking the studs on the wall behind the vanity. Then I set the vanity (with the drawers removed) exactly where I wanted it in the room. I have baseboards sitting on the floor of the bathroom behind the vanity so that kept my vanity from sitting flush against the wall. So I installed a long piece of scrap wood as a spacer between the wall and the top rail on the back of my vanity (the countertop will hide this spacer). Then I pre-drilled through the top rail of the vanity, the spacer, and into the stud in the wall. I then installed large long screws designated to hold a lot of weight through the rail, the spacer, and into the wall at each stud behind the vanity. a screw connects the top back rail of the vanity to a spacer and a stud in the wall close up view And here’s the finished product! For more info on my DIY wood countertop I used with this vanity click here. To see my complete bathroom makeover click here. If anyone does happen to make this vanity then please let me know in the comments… I’d love to see photos!